Exposing Applications for Internal Access
Objectives
After completing this section, you should be able to enable intra-pod network communications for applications deployed in Kubernetes, and learn how to keep communication up even with automatic deployments.
Kubernetes Networking
When pods are created, they are assigned an IP address. You use this IP to access the pod from anywhere within the Kubernetes cluster. Containers inside a pod share the same network space, which means that, within the pod, containers can communicate with each other by using the localhost address.
A Kubernetes cluster might be split across different nodes. A node is a physical machine where resources run. A cluster is a logical view of a set of nodes. These nodes are different machines, but they work together as a logical unit. This makes it easier to work with different machines at the same time because you can simply deploy resources to the cluster and not to individual nodes.
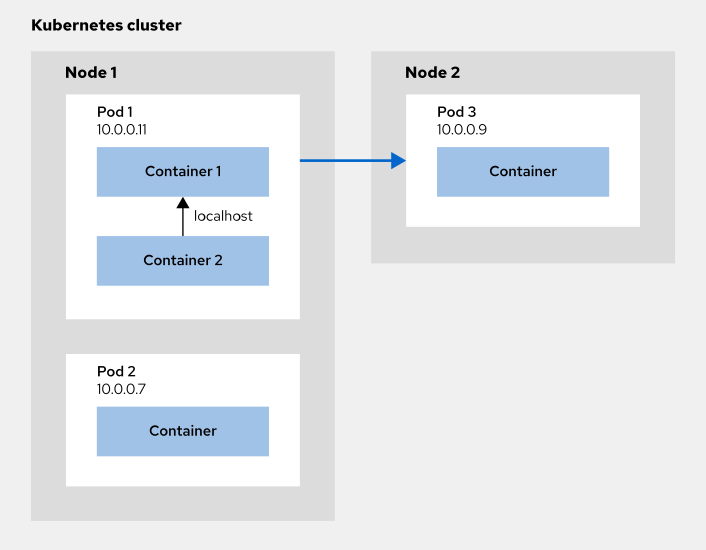
Figure 1. Networking in a Kubernetes cluster
Introducing Kubernetes Services
In a real world environment, deployments are performed on a daily basis. When bugs are fixed or new features are added to an application, a new image version is created and deployed. This means that pods are constantly created and destroyed (the pods of the older version are removed and new pods are allocated for the newer version).
At the same time, applications usually have several replicas and traffic is split across the replicas. This ensures that no single replica is overworked. This is called load-balancing.
In both use cases, the problem is the same: you need a way to reach the pods regardless of the machine where they are located. To solve this, Kubernetes introduces the concept of Service.
A service is an abstraction that defines the access to a set of pods. By using a service, you don’t access pods directly through their private IP addresses. Instead, a service targets several pods based on certain criteria (for example, a label) and forwards any requests to one of the pods matching that criteria.
In other words, a service allows you to group pods with a logical relationship and it allows you to reach them in a reliable way. At the same time, it implements a load-balancing mechanism among the pods that it targets.
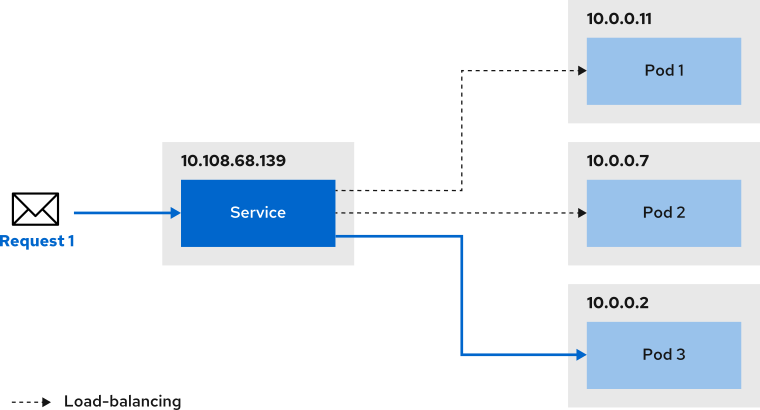
Figure 2. A service redirecting traffic to pod replicas.
For example, if you want to have three replicas of your application then three pods will be created. If you create a service that targets these pods, then the service receives any incoming requests and it routes it to one of them.
By default, a service is given a cluster-internal IP address, which is only valid within the cluster. This type of service is called ClusterIP. This means that pods deployed in the cluster can make requests to the service by using the ClusterIP.
The following diagram illustrates the communication between pods and services. For example, Pod 1 uses the ClusterIP of Service 2 to make requests to the service.
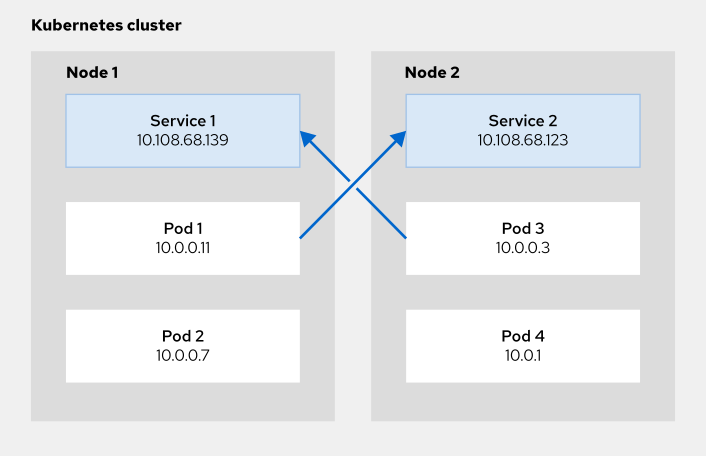
Figure 3. Pod communication using services
If you want to expose the service externally, then you can use other types of services such as NodePort or LoadBalancer. However, the most common way to expose a service outside of your cluster is by using another Kubernetes resource called Ingress. Ingress is covered in upcoming sections of this course.
Creating Kubernetes Services
When creating a service, it is necessary to define the port that the service will serve on. This port is mapped to a target port inside the pod that the service targets. Incoming requests to the service in port are forwarded to the target port in the pod. If no target port is provided, then the port value is used.
There are two ways to create a service in Kubernetes:
-
Using
kubectl expose
The easiest way to create a service is by using the kubectl expose command.
[user@host ~]$ kubectl expose deployment deployment-name --port=8081 --name=service-name --target-port=3000
The previous command creates a service named service-name, which targets deployment deployment-name. It listens on port 80 and it points to port 3000 inside the pod.
Use the command kubectl get service to list the services available. The output will provide you with information such as the ClusterIP (IP only valid within the Kubernetes cluster) and the port used to access the service. A sample output might look like this:
NAME           TYPE        CLUSTER-IP      EXTERNAL-IP   PORT(S)    AGE
service-name   ClusterIP   10.108.68.139   <none>        80/TCP     3s
-
Applying a manifest
An approach in line with the DevOps principles is creating services through a manifest. The following sample creates a service named nginx-service and targets any pod with the label app: nginx. The service listens for requests in port 8080 and forwards them to port 3000 inside the pod. Because the manifest does not include the type field, it creates a service with type ClusterIP.
apiVersion: v1
kind: Service
metadata:
  name: nginx-service (1)
spec:
  selector: (2)
    app: nginx
  ports: (3)
    - protocol: TCP
      port: 8081 (4)
      targetPort: 3000 (5)
-
Name of the service
-
Labels used to select the target pods
-
Port mapping
-
The port that the service will serve on
-
The port inside the pod where requests are forwarded
Discovering Kubernetes Services
A service abstracts your application from knowing the exact location of the pods you are using, but you still need to know the IP of the service to use it from your application. Directly using the IP is a bad idea because if the IP changes in the future, then you would need to manually update it in your application. To avoid this, Kubernetes provides two ways to discover services:
-
Environment variables
By default, when a service is created, Kubernetes injects some environment variables in pods within the same namespace. These variables follow the pattern:
SERVICE-NAME_VARIABLE-NAME
If you have a service named nginx-provider, that generates the following variables (non-exhaustive) then you can simply inject these environment variables into your application:
-
NGINX_PROVIDER_SERVICE_HOST, which contains the IP address of theService. For example,10.0.0.11 -
NGINX_PROVIDER_SERVICE_PORT, which contains the port whereServicelistens on. For example,6379
However, your application tries to fetch the environment variables only on start-up. This means that if the value of the variable changes (for example, a service gets a different IP) after your application has started, then your application is not notified and it references an invalid value (the previous IP address of the service). The same happens if the service is created after your application boots-up.
-
DNS
Given the limitations of the Kubernetes built-in environment variables, the preferred way of accessing services from your application is using DNS.
Every service in the cluster is assigned a DNS name, which matches with the service’s lower cased name. This allows applications to access services using always the same reference. The default FQDN follows the pattern:
service.namespace.svc.cluster.local
However, it is possible to avoid this long form. The DNS server also resolves the following hosts:
-
service.namespace.cluster.local
-
service.namespace
-
service (in this case, Kubernetes expects the service to be in the same namespace)
For example, if you have a service named nginx-service that exposes an HTTP endpoint in the default HTTP port (80), then you can use http://nginx-service if your application is in the same namespace as the service. If the service was in a namespace named nginx-apps, then you use http://nginx-service.nginx-apps.