Keeping Content Relevant with Automation

Do you create technical content and struggle with keeping it relevant? If so, then this post is for you. We’ll discuss the fundamental problem of keeping content relevant and then introduce some automation strategies, tools, and techniques we use here at Kube by Example for helping to keep our content updated and relevant, with as little human intervention as possible.
The strategy we outline here isn’t only relevant for technical content: it can be used to apply continuous integration best practices to everyday software development.
If you create it, update it
Anyone who creates technical content knows and understands one important principle: The more you create the more you need to keep relevant. Technology changes so fast that it quickly becomes out of date. Out of date content becomes irrelevant and isn’t useful to people looking for it. Keeping content updated can be a time-consuming task that must be repeated over and over again: a process we internally call “babysitting”.
Technical content comes in many forms: blog posts, articles, learning paths/lessons, demos, and workshops, just to name a few. These forms may even be combined in some cases.
This post looks at a recently-added Deploying Spring Boot to Kubernetes with Eclipse JKube and ConfigMaps learning path lesson here on Kube by Example and examines the automation strategy employed to keep it updated with very little work.
There are many dependencies used by the application in the lesson, such as Spring Boot, Spring Cloud, and Eclipse JKube, just to mention a few. Whenever we (a human) notice a new dependency version available, we could fork the project, update the dependency, create a pull request, wait for the checks to run, and merge it (assuming all the checks pass). That seems like a lot of work, though, especially since we’d have to do it on two branches. This manual process would also be repeated often. This is what we’re trying to avoid doing!
The lesson itself was designed with this automation strategy in mind: there is very little, if any, content within the lesson itself that depends on a specific version of the underlying technology. Therefore, we can rely on the automation to tell us if any of the content in the lesson itself needs to be adjusted as versions of the underlying technology are automatically updated. It would be nice to automate the lesson content itself, but we’re not quite there - yet!
What does the automation do?
Let's examine some of the automation that allows it to keep itself up to date automatically while still ensuring the code behind the content still works according to the content within the lesson. We’ll begin by describing what happens today and then explain how it all works, detailing all the various pieces that form an end-to-end solution.
The lesson contains content hosted here on the Kube by Example site. A code repository on GitHub backs the lesson. The main branch is where the user starts at the beginning of the lesson, and the solution branch is where they should end up after completing the lesson.
As new versions of Spring Boot, Spring Cloud, Eclipse JKube, or any of the other dependencies within the project are released, the project automatically updates the dependencies, runs its suite of unit tests, deploys itself to minikube, and then runs a set of integration tests against the deployed instance.
All of this automation happens for BOTH Java versions 11 and 17, ensuring that the end result the user builds throughout the lesson continues to work as newer versions of the underlying technologies within the application are released over time, all with very little human input. In fact, the only human involvement is whether or not to accept the update once all of the automation has proven that the update does not break anything.
So, what’s the “magic” that makes this work? Continue reading to find out!
How does the automation work?
There are a few pieces to the automation that, when combined, form a complete end-to-end solution. The total solution wouldn’t be possible without all the parts, each of which we will describe further. This article will guide you through a ground-up approach to everything required to build the automation.
Tests are required
First, a good and full test suite is an absolute requirement for any automation solution. A test suite allows an application to determine whether it behaves correctly. A good test suite contains both unit and integration tests. Unit tests generally test a specific class or module within an application. In contrast, integration tests typically test the application as a black box, interacting with the application as an external consumer.
Unit tests
The tools used to write these tests most likely vary by technology, but in our case, this is a Spring Boot application exposing RESTful endpoints, so unit tests use the Spring Boot Testing features. The HelloControllerTests.java class in the repository contains tests for the endpoints within the application.
The application uses Apache Maven as its build tool. Simply running Maven’s verify phase will compile the application and run its unit tests.
Integration tests
You can use the Spring Boot Testing features to write integration tests. In such cases, the build tool (Maven) will first launch the application in a separate process and then execute the test classes against the running application. However, that doesn’t work if our goal is to package the application, deploy it somewhere in some running environment, and run some tests against it.
Postman is a great tool for testing REST APIs in a technology-agnostic way. Postman doesn’t care what the technology stack of the application being tested is. Postman Collections are a group of saved requests containing tests. The application contains a Postman Collection, ensuring that an instance of the application running on Kubernetes will have a certain set of expectations.
Continuous integration
Next, we need a pipeline to execute the tests. There are many pipeline technologies out there - Jenkins, Tekton, GitHub Actions, Circle CI are just a few. GitHub Actions are what is used in this project. They are well integrated into GitHub. They allow a GitHub project to build pipelines that can be triggered by many different kinds of events, including code check-ins, pull requests, on-demand, and on-schedule.
GitHub action workflows
First, we need to define a GitHub Action workflow. A workflow is a series of jobs that various events can trigger. Each job contains steps that are executed to complete it. There are many different ways to structure workflows and jobs.
Remember, this project has two branches: main and solution. The solution branch contains the result of completing the lesson, which includes deploying the application to minikube using Eclipse JKube and reading the ConfigMap from Kubernetes. The main branch is just a skeleton application. Both branches contain the same unit tests, but only the solution branch contains the Postman Collection integration tests.
For our use case, we decided to keep it as simple as possible; therefore, we only have a single workflow. Both branches will contain the workflow. The workflow in both branches contains a job that compiles the application and executes its unit tests. The compilation and test execution should be performed with Java versions 11 and 17. Only the solution branch needs to execute the integration tests, again for both Java versions 11 and 17.
A GitHub Action workflow is a YAML file in the .github/workflows directory of a project hosted on GitHub. The name of the file can be whatever you like. Let’s examine this project’s workflow.
main branch
The main branch’s workflow file, build-test.yml, is pretty simple and looks similar to most Java applications that use Maven (we’ve omitted a few things from this listing for brevity):
name: Build and test

on: <1>
  workflow_call: <2>
  workflow_dispatch: <3>

jobs: <4>
  simple-build-test: <5>
    runs-on: ubuntu-latest <6>
    if: github.repository == 'RedHat-Middleware-Workshops/spring-jkube-external-config' <7>
    strategy: <8>
      matrix: <9>
        java:; <10>
          - '11'
          - '17'
      fail-fast: false <11>
    name: "build-test-java-${{ matrix.java }}" <12>
    steps: <13>
      - uses: actions/checkout@v3 <14>

      - name: Setup Java ${{ matrix.java }} <15>
        uses: actions/setup-java@v2
        with:
          java-version: ${{ matrix.java }}
          distribution: temurin
          cache: maven

      - name: Run build and tests with Java ${{ matrix.java }} <16>
        run: ./mvnw -B clean verify -Dmaven.compiler.release=${{ matrix.java }}
- Defines the triggers for when the workflow will run.
- For now, we’re omitting most of what goes in here. We’ll cover triggers in a later section.
- The
workflow_calltrigger allows this workflow to be reused in another workflow. More on this in thesolutionbranch workflow in the next section. - The
workflow_dispatchtrigger allows this workflow to be manually executed. This allows a human to run the workflow whenever they’d like by clicking a button in the GitHub UI. - Defines the jobs within the workflow. There is only a single job in the
mainbranch. - The name of the job - it can be whatever you want it to be.
- The host operating system the job should run on.
- Ensure that the workflow only runs on triggers from the repository it belongs to. Without this, anyone who forks the repository could inadvertently run the workflow in their own fork.
- Some parameters for running the workflow.
- The job is a matrix job. All permutations of all matrix parameters are computed, and a specific job for each permutation is created. By default, each permutation job is executed in parallel.
javais a matrix parameter that will control all the Java versions we wish to test against. The parameter's name (java) can be whatever you want it to be. We define11and17as the major Java versions we want to test against.- Controls whether GitHub should cancel or stop all matrix jobs if one of them fails. The default value is to cancel the jobs. We feel we’d like to see all of them executed even if only one fails.
- A name for the computed matrix job. Typically you want to include one (or more) of your matrix parameters in the job name so that one job can be distinguished from another.
- The steps, executed sequentially, to complete the job.
- The Checkout Action, hosted in the GitHub Action Marketplace, checks out the code which triggered the action.
- The Setup Java JDK Action, hosted in the GitHub Action Marketplace, sets up a Java distribution for use by subsequent steps within the job. The step references the java matrix parameter and uses it to determine which Java version of the Temurin distribution to use.
- Compile the application and run the unit tests using Maven.
solution branch
The solution branch’s workflow, also named build-test.yml, is a little more complex.
First, it needs to compile the application and run its unit tests (hmmm - I wonder where we saw that before?). Second, it needs to deploy the application to minikube using the same steps and commands as in the lesson. Third, it needs to run the Postman Collection integration tests against the deployed instance. Last, as all good shared infrastructure citizens should do, it needs to tear down the minikube instance it created.
The Postman ecosystem contains a command-line Collection Runner, Newman, enabling you to run and test a Postman Collection on the command line. Newman is installed via an NPM module. We’ll show how to integrate it into the workflow.
Let’s take a look at the workflow:
name: Build and test

on: <1>
  workflow_dispatch:  <2>

jobs:
  simple-build-test:  <3>
    uses: RedHat-Middleware-Workshops/spring-jkube-external-config/.github/workflows/build-test.yml@main

  int-test:  <4>
    runs-on: ubuntu-latest
    needs: simple-build-test  <5>
    if: github.repository == 'RedHat-Middleware-Workshops/spring-jkube-external-config'
    strategy:  <6>
      fail-fast: false
      matrix:
        java:
          - '11'
          - '17'
    name: "int-test-java-${{ matrix.java }}"
    steps:
      - uses: actions/checkout@v3  <7>

      - name: Setup Java ${{ matrix.java }}  <8>
        uses: actions/setup-java@v2
        with:
          java-version: ${{ matrix.java }}
          distribution: temurin
          cache: maven

      - name: Setup Node.js  <9>
        uses: actions/setup-node@v3
        with:
          node-version: '16'

      - name: Install newman  <10>
        run: npm install -g newman

      - name: Start minikube  <11>
        uses: medyagh/setup-minikube@latest

      - name: Verify cluster available  <12>
        id: verify-minikube-available
        run: kubectl get pods -A

      - name: Deploy to minikube  <13>
        shell: bash
        run: |
          eval $(minikube -p minikube docker-env)
          ./mvnw -B clean k8s:deploy -Pk8s -Dmaven.compiler.release=${{ matrix.java }}

      - name: Sleep for 30 seconds to wait for deployment
        shell: bash
        run: sleep 30s

      - name: Get app service url  <14>
        run: echo "SERVICE_URL=$(minikube service -n spring-jkube-external-config spring-jkube-external-config --url)" >> $GITHUB_ENV

      - name: Run integration tests  <15>
        working-directory: .github/workflows/postman
        run: newman run spring-jkube-external-config.postman_collection.json -e spring-jkube-external-config-kube.postman_environment.json --env-var SERVICE_URL=${{ env.SERVICE_URL }} --verbose

      - name: Tear down app  <16>
        if: steps.verify-minikube-available.outcome == 'success'  <17>
        run: |
          kubectl delete ns spring-jkube-external-config
          minikube stop
- Defines the triggers for when the workflow will run.
- For now, we’re omitting most of what goes in here. We’ll cover triggers in a later section.
- The
workflow_dispatchtrigger allows this workflow to be manually executed. This allows a human to run the workflow whenever they’d like by clicking a button using the GitHub UI. - Define a job that will compile the application and run its unit tests. This job is exactly what the workflow on the main branch does. Rather than copy/paste its contents, we call the main branch workflow directly.
- Define a job that will install minikube, deploy the application to it, and execute the integration tests.
- Defines a dependency between the
int-testjob and thesimple-build-testjob. Theint-testjob only executes if thesimple-build-testjob completes successfully. - The job strategy on the
solutionbranch is the same as on themainbranch: the jobs need to execute against both Java 11 and 17. - Checkout the code.
- Set up the Java distribution.
- Set up the Node.js environment. This is required so that Newman can be installed.
- Install Newman.
- Install and start minikube using the Setup Minikube Action from the GitHub Action Marketplace.
- Run a quick sanity check to ensure that minikube started successfully and is available.
- Deploy the application to minikube using the same command as in the lesson.
- Fetch the URL to the application service on minikube using the same command as in the lesson. Save the URL as an environment variable so it becomes available to subsequent steps in the job.
- Run the integration test by executing Newman and passing the service URL environment variable to it. Newman will return a non-zero exit status if any of the tests fail, which causes the step, and therefore the job, to fail.
- Tear down the application and stop the minikube cluster.
- The tear-down step should only be executed if the verify cluster step was successful.
Continuous integration triggers
Now that our workflows are defined, we can bind them to specific events or triggers. Let’s think about when we’d like our workflows to run.
GitHub’s pull request mechanism is a great collaboration tool for teams working within the same codebase. Pull requests enable teams to propose changes to a shared codebase, collaborate about or review the change, and make sure the proposed change doesn’t break anything before merging it into a target branch. Running the workflows against pull requests before code makes it into one of the branches is a good way to ensure a proposed change doesn’t break existing things.
Additionally, it probably makes sense for a workflow also to run when any commit happens directly on one of the branches.
Let’s look at how to set up these triggers.
Workflow triggers
Workflow triggers are defined in the on: section of a workflow file. Let’s take a look at that section of the workflow now. It is nearly the same for both the main and solution branches. The only difference is the branch name in the triggers.
on:
  workflow_call:
  workflow_dispatch:
  push:  <1>
    paths-ignore:  <2>
      - '.github/dependabot.yml'
      - '*.md'
    branches:  <3>
      - main
  pull_request:  <4>
    types:  <5>
      - opened
      - synchronize
      - reopened
      - ready_for_review
    paths-ignore:  <6>
      - '*.md'
      - '.github/dependabot.yml'
    branches:  <7>
      - main

concurrency:  <8>
  group: "workflow = ${{ github.workflow }}, ref = ${{ github.event.ref }}, pr = ${{ github.event.pull_request.id }}"  <9>
  cancel-in-progress: ${{ github.event_name == 'pull_request' }}  <10>
- Configure the workflow to run on push events.
- Ignore the workflow when pushing certain files and file patterns. For example, there’s no need to run the workflow if only the documentation was updated. We’ll discuss dependabot in the next section.
- Only run the workflow on pushes to the specified branch. The
solutionbranch name is listed on the workflow file in its branch. - Configure the workflow to run on pull request events.
- By default, GitHub Action workflows configured to run on pull requests will be triggered on three types of activities:
opened(pull request created),synchronize(commit(s) pushed to the pull request), andreopened(a closed pull request is reopened). We also want to run the workflow on theready_for_review(pull request is taken out from draft mode) activity type. - Same as with the push event, ignore the workflow when the changes are only on certain files and file patterns.
- Same as with the push event, only run the workflow on pull requests targeting the specified branch.
- Defines the concurrency level for jobs. The concurrency level defines how many concurrent instances of the workflow can be active at any given time based on certain parameters, called the group.
- Defines a unique key used to determine if more than one instance of a workflow can run at any given time. In our case, only one instance of the workflow targeting the same branch can run at any given time. If the workflow is running because of a pull request, each pull request can only run the workflow one at a time, but multiple pull requests can run concurrently.
- Defines whether or not to cancel any in-progress workflow instances. In the case of a pull request, if a new commit is pushed to the pull request while the workflow is running, that workflow instance should be canceled, and a new instance started.
Having the triggers in place is great, but only defining triggers doesn’t require the workflow to run to success prior to taking action on a proposed change. That's where GitHub protected branches come in.
Protected branches
GitHub protected branches allow you to define rules and requirements on certain branches, dictating things like reviews are required or that certain checks need to run to success before merging.
To configure protected branches, go into the project’s Settings on GitHub. In the Code and automation section on the left-hand side, click Branches. We have protected branch configurations for both the main and solution branches in our setup.
Here is what our protected branches configuration looks like for the solution branch:
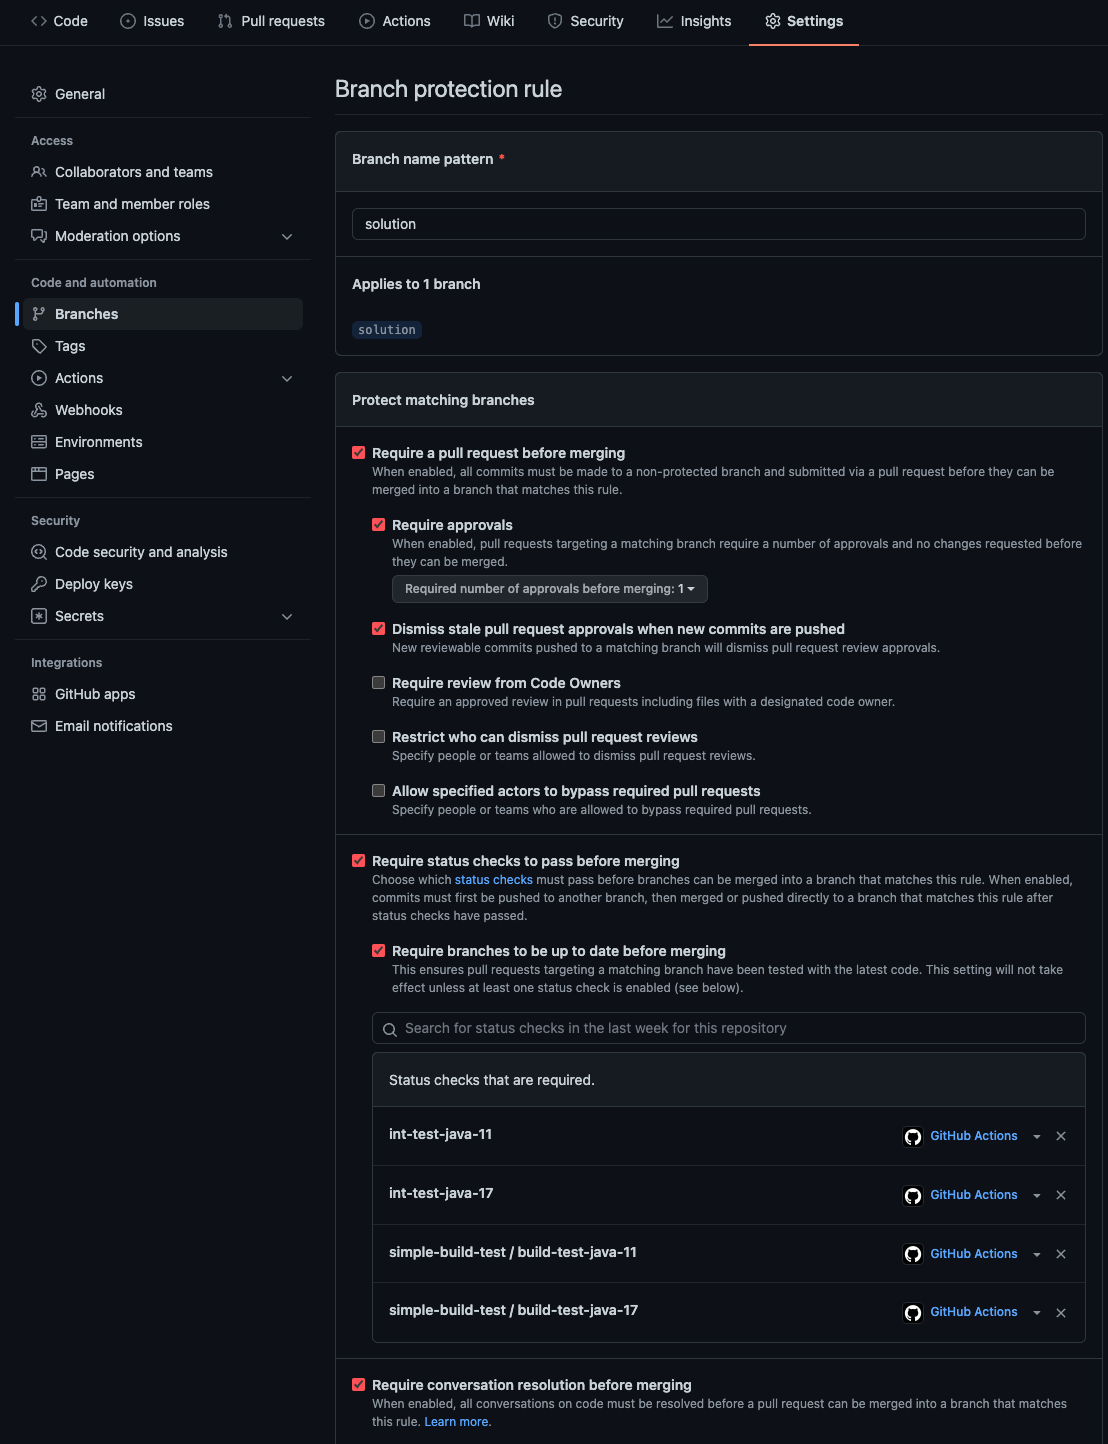
The only difference in the main branch is the required status checks. The main branch only requires the build-test-java-11 and build-test-java-17 checks. The integration test job isn’t part of the workflow on the main branch.
This combination of settings ensures that
- Pull requests are required before code can be merged into the target branch.
- Pull requests require at least 1 approval before they can be merged into the target branch.
- Any existing approvals on a pull request are dismissed whenever a new commit is pushed to the pull request.
- Defined status checks must pass before a pull request can be merged.
- Pull request branches must be up to date before they can be merged. This means that any new changes on the target branch that came after the pull request was created (or last updated) must be merged into the pull request, and the checks need to then pass again.
- Any conversations that happened during the pull request’s review must be resolved before it can be merged.
Automated version updates
So far we’ve built a smart pipeline that requires testing changes before they can make it into one of the branches. The final part of the puzzle that we haven’t covered is ”how do we automatically keep the versions of dependencies within the application updated?” After all, this is the point of this article!
Fortunately, there is a way to automate that process, too with GitHub Dependabot. Dependabot can watch the upstream repositories the application uses (Maven Central in our case). It can compare the versions of dependencies used by the application with versions in the source repository. If it notices an updated version, it will create a pull request against the project containing updates to its dependency configuration file(s) (pom.xml in our case).
Dependabot also follows the Single Responsibility Principle: if multiple dependency updates are found, multiple pull requests are opened, one for each dependency. The full pipeline can then be run against each dependency upgrade in isolation. Additionally, if multiple pull requests are opened due to multiple dependency updates, because of the branch protection rules in place, each time one of the pull requests is merged, the others will automatically merge the change into its pull request and re-run the automation.
Taking it a step further, you can configure Dependabot to monitor multiple branches and to open pull requests targeting different branches. Doing so allows you to keep dependency updates targeted to specific branches while keeping those updates isolated from other changes across multiple branches.
Dependabot is enabled by placing a configuration file named dependabot.yml in the .github directory of the project’s default branch (main in our case). Our configuration contains two update configurations, one for each branch. The only difference between the two configurations is the target branch (main vs solution).
version: 2
updates:
  - package-ecosystem: maven  <1>
    directory: /  <2>
    open-pull-requests-limit: 10  <3>
    schedule:  <4>
      interval: daily
    target-branch: solution  <5>
    labels:  <6>
      - "version-upgrade"
    pull-request-branch-name:
      separator: "_"
    ignore:  <7>
      - dependency-name: org.apache.maven.plugins:maven-compiler-plugin

  - package-ecosystem: maven  <8>
    directory: /
    open-pull-requests-limit: 10
    schedule:
      interval: daily
    labels:
      - "version-upgrade"
    pull-request-branch-name:
      separator: "_"
    ignore:
      - dependency-name: org.apache.maven.plugins:maven-compiler-plugin
- The first update configuration uses the Maven packaging ecosystem for the
solutionbranch. - The directory containing the dependency configuration file.
- Optionally set a limit on the number of pull requests that Dependabot can open targeting the branch at one time.
- The schedule to check for updates. We run it daily.
- The branch to target. Uses the project’s default branch if not specified.
- Any labels to apply to the pull request that gets opened. Labels are a good way to organize your issues and pull requests.
- Dependencies for Dependabot to ignore. In our case, we don’t want it to update the
maven-compiler-plugin. - The second update configuration uses the Maven packaging ecosystem for the
mainbranch.
Wrap up
As you can see, combining a good test suite with GitHub Actions, pull requests, protected branches, and Dependabot enables us to be mostly hands-off when it comes to keeping our content updated and relevant. We could automate the entire process by configuring GitHub to automatically merge pull requests opened by Dependabot, targeting specific branches that pass the required status checks. We just aren’t quite ready for that - yet!